Sealant-only repairs crack under Houston’s thermal cycling. We install mechanically fastened systems that hold.
Step Flashing Plus Embedded Counter Flashing
Chimney flashing repair closes the gap between your chimney and roof with a mechanically secured metal system.
Chimney flashing, the system of metal pieces installed where your chimney meets the roof surface, is the most common entry point for chimney leaks in Houston. If you’re already dealing with water intrusion, our chimney leak repair service in Houston addresses the full scope of damage once the flashing source is confirmed. A correct repair installs two separate components: step flashing along the chimney sides and counter flashing embedded above it. Together, they create a seal that moves with the roof and chimney independently. Sealant alone cannot do that. 832 Home Service installs mechanically fastened two-part systems across the Houston metro, step flashing secured at each shingle course, counter flashing anchored into the mortar joint above it, so the repair holds through the thermal cycling that pulls surface-only repairs apart within a season or two.
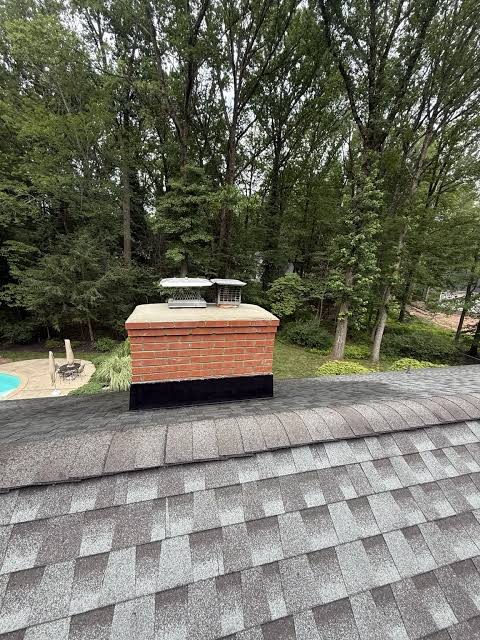
Thermal roof movement in Houston is the primary reason flashing fails here faster than in cooler climates. Houston roofs expand in summer heat and contract on cooler nights. That daily cycle, common from April through October, works on every metal fastener, every mortar bed, every point where dissimilar materials meet. The roof deck and the chimney masonry move at different rates. Flashing sits at exactly that junction. For a deeper look at how Houston’s heat and humidity accelerate chimney damage, our resource guide covers the full climate picture behind these failures.
The gap that opens is often less than a sixteenth of an inch. You cannot see it from the ground. But Houston’s wind-driven rain finds it on every storm pass.
In Pasadena, Deer Park, La Porte, and Baytown, post-1970 residential neighborhoods with standard asphalt shingles and galvanized flashing, 832 Home Service regularly sees the full corrosion and separation pattern that develops after 30 to 50 years of Gulf Coast thermal cycling. The galvanized steel loses its protective coating. The step flashing pulls away from the chimney face at the mortar bed. The counter flashing, a separate metal strip embedded into the chimney above the step flashing, separates from the reglet cut, the narrow slot anchoring it into the brick. The result is an invisible gap at the roofline junction. Water follows gravity directly into it.
This is an architectural failure, not a maintenance failure. The fix is mechanical reinstallation, not surface application over an open gap.
Gap that lets water in
Years to full failure
Serving Greater Houston
Components in a correct system
Every repair follows a three-phase sequence: assess what’s there, install what’s correct, confirm the result.
We begin on the roof, not the interior. The chimney flashing system is assessed component by component: step flashing separation at each shingle course, counter flashing position relative to the reglet cut, saddle flashing or cricket condition at the upslope chimney face, and the mortar joint condition where the counter flashing is embedded. We document the existing repair history, including any prior sealant applications, so the final installation scope accounts for what’s already there.
For chimneys wider than 30 inches, we assess the upslope face for saddle flashing, a small peaked structure behind the chimney that directs water around the chimney base rather than allowing it to pond at the junction. Houston rooflines with debris accumulation from live oak overhang frequently show accelerated junction deterioration on wider chimneys without it.
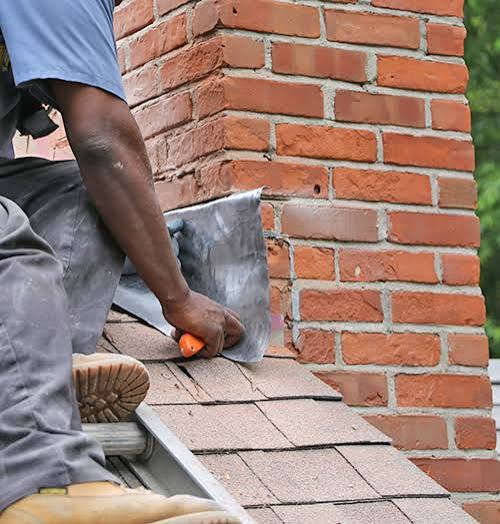
Step flashing is reinstalled first. Each L-shaped piece, individual sections of metal that direct water away from the chimney face and down the roof slope, is secured at its shingle course before the next course is set. The overlap sequence is confirmed at each piece before we move up the chimney face.
Counter flashing installation follows. A reglet cut is made horizontally into the mortar joint at the correct height above the step flashing. If the existing mortar joint shows deterioration at the reglet line, we address it through mortar joint repair and repointing before the counter flashing is anchored. The counter flashing top edge is inserted into the reglet and mechanically set. The face laps down over the step flashing below it, covering the top edge of the step flashing against wind-driven water entry. Sealant is applied at the reglet edge only, to seal the mechanical anchor point, not to substitute for it.
We inspect the full flashing system from the roofline before leaving. The counter flashing seating in the reglet is confirmed. Step flashing overlap is checked at each course. The saddle flashing junction, where present, is confirmed watertight at the chimney face. Before-and-after photographs document the completed installation.
Every chimney flashing repair 832 Home Service completes follows a specific material and method standard. Once flashing is mechanically secured, we also recommend our chimney waterproofing and sealing service as a complementary next step to protect the masonry surface from moisture absorption going forward.
Aluminum or galvanized steel minimum; copper available for longer service life on coastal properties within 20 miles of Galveston Bay.
Embedded into the mortar joint via reglet cut, not surface-applied, not sealant-bonded.
Every prior repair evaluated and documented before new materials are installed.
Visible gaps inspected from roofline after installation; counter flashing seating confirmed before departure.
Assessed on every chimney wider than 30 inches at the upslope face; installed where water accumulation is confirmed.
Applied only at the reglet cut edge to weatherproof the mechanical anchor, never used as the primary structural seal; the CSIA homeowner resources on chimney water damage outline why industry-standard flashing installation relies on mechanical anchoring rather than surface sealants.
Step flashing reinstallation coordinated with adjacent shingle courses, no exposed gaps at the overlap points.
Prior flashing applications are the most common starting condition we encounter, and the clearest diagnostic signal.
832 Home Service field team, Houston metro
I’ve been on enough rooflines in Harris County to read a prior flashing repair before I get within ten feet of the chimney. There’s a thick bead of caulk running along the chimney base where the counter flashing meets the brick face. Sometimes it’s gray. Sometimes it’s been painted to match the mortar. It looks finished.
What it actually shows: a flexible bridge over a gap that has already opened. The step flashing underneath is still pulling away from the chimney at each shingle course. The counter flashing is still separated from the reglet cut. The sealant is spanning the distance between them. In Houston’s summer heat, that sealant is already losing the flexibility it needs to move with the roof and masonry independently.
On one La Porte property I inspected, the homeowner had three prior sealant applications over roughly eight years. Each one had held for about one season before cracking at the bond line where the sealant met the chimney brick. The mortar bed underneath had been pulling the step flashing outward the entire time, one sixteenth of an inch, then an eighth, then more. By the time I was on that roof, there was a visible gap at the base of the chimney face that no surface application could span.
We reinstalled the step flashing, each L-shaped piece secured at its individual shingle course so water is directed down the slope, not back toward the chimney face. Then we cut a new reglet into the mortar joint above it and embedded fresh counter flashing. The top edge is mechanically held. The bottom edge laps over the step flashing. No sealant is doing structural work.
That’s what a mechanical two-part system accomplishes that a surface bridge cannot: each component is independently secured, and the seal is maintained by overlap and fastener position rather than adhesive flexibility.
Before we install anything, we identify exactly where water is entering through thorough chimney leak inspection and diagnostics, so the repair targets the confirmed source, not the most visible one.
A properly installed two-part flashing system handles wind-driven rain differently than surface-applied sealant.
Houston gets named storm events. It gets tropical storms that push rain sideways into roofline junctions at sustained wind speeds. Homeowners reasonably ask whether a flashing repair will hold through that kind of weather.
The step flashing is mechanically fastened at each shingle course. It cannot lift because each piece is held independently. The counter flashing is embedded into the mortar joint, held in the reglet cut by the mechanical grip of the masonry, not by adhesive. Wind-driven water that finds its way behind the counter flashing face is still redirected by the step flashing below it.
No chimney flashing system is tested at hurricane wind speeds. But a two-part mechanical installation with properly embedded counter flashing performs structurally differently than a surface-applied repair, because the seal is created by overlap and position, not by the adhesive strength of a bead of caulk in 95-degree summer heat.
We document every flashing repair with before-and-after photographs. The components, the installation sequence, and the final roofline seal are all on record. For chimneys that have experienced significant flashing failure over multiple seasons, we recommend a Tier 2 chimney inspection to assess water damage to the full flashing system and surrounding masonry before finalizing the repair scope.
Houston’s daily thermal cycling, roofs expanding in summer heat and contracting on cooler nights, works on every joint where dissimilar materials meet. Sealant loses its flexibility in 95-degree heat and cracks at the bond line, usually within a season or two. A mechanically fastened two-part system holds because the seal is created by overlap and fastener position, not adhesive.
Step flashing is the series of L-shaped metal pieces secured at each shingle course along the chimney sides, directing water down the roof slope. Counter flashing is a separate metal strip embedded into a reglet cut in the mortar joint above it, lapping down over the step flashing to seal against wind-driven water. A correct repair installs both.
No flashing system is tested at hurricane wind speeds, but a two-part mechanical installation performs structurally differently than surface sealant. Step flashing is fastened at each shingle course so it cannot lift, and counter flashing is held by the mechanical grip of the masonry. Water forced behind the counter flashing is redirected by the step flashing below.
Yes. Prior sealant applications are the most common condition we encounter. We evaluate and document every existing repair before installing new materials, because a thick caulk bead usually hides a gap that has already opened underneath. Let us know when you call, it helps us prepare the right materials before we arrive.
We assess saddle flashing, also called a cricket, on every chimney wider than 30 inches at the upslope face. It is a small peaked structure that directs water around the chimney base rather than allowing it to pond at the junction. We install it where water accumulation is confirmed, which is common on wider chimneys with live oak debris overhead.
Chimney flashing repair closes the gap between your chimney and roof with a mechanically secured metal system.
Chimney flashing, the system of metal pieces installed where your chimney meets the roof surface, is the most common entry point for chimney leaks in Houston. Our repairs install two separate components: step flashing along the chimney sides and counter flashing embedded above it. Together, they create a seal that moves with the roof and chimney independently. Sealant alone cannot do that. 832 Home Service installs mechanically fastened two-part systems across the Houston metro so the repair holds through the thermal cycling that pulls surface-only repairs apart within a season or two.
832 Home Service Field Team
Houston Metro & Gulf Coast
832 Home Service repairs chimney flashing across the full Houston metro and Gulf Coast service area.
A mechanically secure chimney flashing repair starts with one call to 832 Home Service. Call 832 Home Service at (832) 662-3437 or email info@832chimneyservices.com to schedule your Chimney Repointing assessment.
WhatsApp us
Tell us what’s going on and we’ll get back to you, often the same day.
Prefer to talk? (832) 662-3437